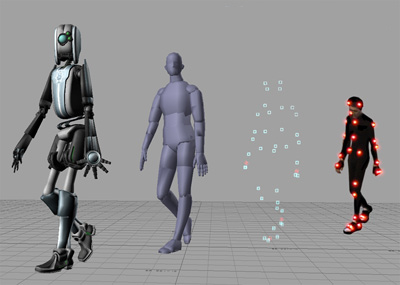
Tuesday, 23 February 2010

CAT - Materials and Lighting


Summary
"We've added a material to the body that had a texture on three different texture channels, and added two materials to the eyes. We had to rotate the eyes outward to make them look good for this character. Next, we'll rig the character with an armature (an armature is sort of like a skeleton) so we can animate it."

USEFUL TIPS
CTRL ALT NUMPAD-0 - snap camera to current view
SHIFT P - preview render (drag to area)

Monday, 22 February 2010

CAT - Mod - 6 Torso Legs and Feet

Summary
"We created the torso, legs, and feet in a series of extrudes and vertex movements."


Having finished creating the model I've learnt a number of infinitely useful techniques that I'll use in the future, certainly for character animation, and importantly for making the models I need for my 'power ranger' animation.

CAT - Mod - 5 Neck and Shoulders

Tuesday, 16 February 2010

CAT - Mod - 4 Modelling the rest of the head

Summary
"That's it! Now you have a face with enough geometry that you can animate facial expressions. Next, we'll create a body for the character, before moving on to rigging and animation. Get ready for more extruding and moving!"

  • I extruded the mesh to give more loops for the head, then chose the four centre vertices on the final loop and extruded.
  • I switched to rear view and using G I 'grabbed' the vertices and moved them towards the centre, 'snapping' them in place. (back of skull)
  • To fill the gaps I selected four vertices and pressed F
I next used the ALT box select tool, and loop selected the mouth, extruding it backwards into the head. Then closed off the mouth (faces), and then shaped it to close (new loop), scaled back of mouth.

Finally I changed the mouth expression to be 'bored', by lifting and lowering vertices.


USEFUL TIPS
CTRL 1 - Rear view
ALT B - select what part of mesh you want to see

CAT - Mod - 3 Creating the face and eyes

Summary
"We extruded the mouth further to form the face, added an eye, then duplicated and mirrored the eye using the 3D Cursor as a reference point. After a few more tweaks to the mesh, we now have a face with eyes and eyelids. Now we can finish making the head."

One thing I found very difficult was keeping the mesh and its vertices balanced. I needed to be constantly aware of the overall shape I was creating, and it was an alien process to me really. (see image)

Making the eye
  • I added a new loop in place for the eye, and then deleted the two 'edges' for the eye holes.
  • The eye must be able to rotate independently so I added a UVsphere (rings 8, segments 8)
  • I positioned the eye where I wanted it, set smooth and added subsurf modifier.
  • Placed cursor in centre of head (would be important for duplicating eye) changed to 3D cursor
  • Duplicated and mirrored sphere (SHIFT D, CTRL M, X)
USING LAYERS
In the future when having really complicated meshes it is good practise to have different parts on different layers. So I selected both eyes and put on layer 2, so the head is on layer 1, I then selected both layers in the 3D window so I'd be able to go on as normal but with the ability to see them separately.

Looking just at eyes I needed to mirror the axis so they both had Z above and X to the right, it was the opposite on the second because it had been mirrored.


USEFUL TIPS
SHIFT S - cursor to selection (centres cursor) ALT R - clear rotation
CTRL 3 - look at other side
ALT right mouse click - selects surrounding loop/vertices

CAT - Mod - 3 Creating the face

I 'lifted' the mouth up by extruding the above vertices and shaping like a head. Proportional editing was very useful, one can shape the vertices around the selected area and keep it all relative.

I had previous experience that sometimes when using the subsurf modifier
black blocky lines would appear, I learnt that by recalculating normals you can eliminate these. (EDIT/select all/CTRL N)

CAT - Mod - 2 Creating the mouth

Summary
"Great! You've learned the primary tools for modeling: Grab, Scale, Rotate, and Extrude. These skills will be very important in the next part of the tutorial. We started the mouth and then smoothed it using Set Smooth and a Subsurf Modifier, and saw how to apply the modifier to Edit Mode."

This was a very useful tutorial, yes I had used all of these techniques before, but it helped to familiarise the optimum results one can get from them. I'd never really modelled complicated/human like shapes before so it was a welcome thing to be doing.

Using loops was new to me, it's a technique used to add more vertices so when tweaking the mesh the user has more control and can manipulate the shape they want.

Creating Loop
  • CTRL R - to enter loop cut mode
  • Position loop
  • Left click - confirm area
  • Position along area, click mouse scroll, to centre.
Then it was all about tweaking vertices, changing positions, scale etc.


CAT - Modelling - 1 Setting up the mesh

Summary
"We created a simple mesh, deleted half of it, and then mirrored it. Now we can model only one half of the character, and the other half will automatically update."

This tutorial used pretty basic techniques that I already knew, though I hadn't really explored using a mirror modifier, so that was useful.

USEFUL TIPS
// when adding a mirror - clipping - means the vertices can't cross over
// click left mouse button in place - press C to center


Character Animation Tutorial (CAT)

Obviously I'm going to need to rig and skin a character, and need to know how to create the sort of thing I want, so I've found this 3D character tutorial that covers everything I need to know.

http://wiki.blender.org/index.php/Doc:Tutorials/Animation/BSoD/Character_Animation

I will start by working through this.

Tuesday, 26 January 2010

Experimenting with .bvh files


Now I had some motion files to play with it was time to put them into a modelling package.

I opened up blender and with an empty project and imported motion capture (.bvh)

I was given the option to import as "empty" or as "armature", I believe empty is for using for a skeleton as it displays the motion as vectors (x,y,z), this was not what I'd be using. So I chose armature.

After splitting the window to make way for the timeline I increased the animation length to 900, as there wer 850frames in this example. And there it was the motion I had used myself in blender.

I then got the camera to move around the scene using loc/rot key frames, and follow the armature.

Because it's an armature it means it won't display when rendered. It needs to be rigged onto a model, using bones.


I've found out that .bvh files can be imported successfully into blender,
next I need to find out about rigging and bones.

Monday, 28 December 2009

Using the suit again

This time it was my turn in the suit, it took a while to get on and felt unusual at first. It was rather sweaty and still had quite strong odours..

We had a lot of trouble getting the two wireless connectors to interact with each other. Swapping the two aerials around and this worked.

We then hit another hurdle with the calibrating of the suit. I lay down on two large cushions (so to be away from any magnetic interference) but when I stood up the model in Cobra would fall into the floor.

// This was because we were starting 'Cobra' before I had stood up, so it would think the default position was when I was lying down.

We re-ran Cobra while I was stood and the model moved quite well, still with a few technical issues (like the time before) but the movement of the arms was much better.

We shaped the points for the actor file into a body shape, rather than following the actor images. This was just so we could get a more balanced shape for the trials we were doing.

We found that when I focused towards the box (and computer where we run the Cobra etc. programs) the model would not go wrong (arms switching from left to right - appearing backwards).
// It seemed depending on the direction the person in the suit faced the result would be different - better when facing the computer

We than tried a few sketches, using RECORD, and STOP - saving each sequence separately.

I will try to put a few of these sequences into Blender to get an overall feel of how the process works.

Monday, 30 November 2009

Using the suit for the first time

Monday 30th November

Tom Parkin, Jamie Hogan and I went to Mel 114 as planned and learnt some of the basics using the motion capture suit.

We began by checking where there was strong magnet force on the ground (where electric current ran through wires) and sticking pieces of paper there. This would help us to avoid stepping there when using the suit to avoid any interference.

We then learnt a bit about the software, each time to calibrate the suit we need to run 'go60fps.bat', when it detects all the sensors and is happy we run cobra view. This displays a simple stickman shape, we tried moving an arm and it showed up on the computer. When making a sequence we just select actions/record and then it will record what the suit does, when we're done hit stop and save it as a '.bvh' file (most common mocap data file)

Jamie was the one to use the suit, so we got him strapped in, making sure the suit was skin tight. We adjusted the sensors to be close to the bone, away from muscly areas; so the movement of the bone was tracked and not the muscle. There are a lot of velcro straps on the suit so it isn't difficult to eliminate the slack.

We then took pictures of Jamie in the calibration cube. We took a photo, from about waist height, of his front, and then his right side. We imported these photos on to the computer using 'auto cal' t o create an actor file for Jamie. We had to adjust the points to his body/arms/legs etc. We then loaded it into the cobra program and had Jamie stand completely still while it calibrated, idealy Jamie would be lying down.

When happy Jamie moved around and the stickman mirrored his movement, well almost...

We had a number of issues go wrong, his legs would cross and it would get worse as it went on, because the magnetic force would become stronger. When Jamie would raise his arms completely the stickman shoulders up would point down. I think perhaps the actor file was not clear enough, but it is expected to encounter problems when using this for the first time.

Need to take a break from this until Thursday Dec 10th because of other assignments, but we know the direction we are headed and how much time it takes to get an actor set up. Steve Harris was very helpful and it will help to have more people helping when we try again.

Monday, 23 November 2009

Putty screenshots


Modelling a putty

  • started with a cube
  • subdivided once
  • extruded region a few times - neck and shoulders
  • scale out the shoulders
  • extrude once for arms
  • then extrude along to make arms
  • extrude again for chest
  • keep going for legs
  • all only one side
  • when one half is done:
  • add mirror, click button to see faces
  • 'do clipping' - keeps two parts together
  • using the 'loop' tool (CTRL R) I placed new vertices along the arm
  • added more detail to faces
  • subsurfed
  • subdivided
  • made look more realistic

Modelling a putty

The enemies the power rangers fight are very simple, and so they would be a great thing to use in my animation. I could have them running at my character and have them exploding when hit.

I'll start modelling just to get back to grips with it all. Then I'll look at a tutorial for rigging a character to make it move.

If I had the enemies' animation solely created in Blender up against the character's animation made with Motion Capture I would be learning two different but very useful techniques.

Power Ranger fight sequence

Further Ideas

Model to do inhuman things
  • fly
  • super strength

Using props

  • Kendo stick - like toy ninja 2
  • sword

Hitting enemies/objects

  • fight scene
  • kick
  • hit
  • explode on hit

Explosions - I could use particle effects in Blender for this, here are some videos I created a while ago in Blender, experimenting with various particle effects

(exploding split edges)

Getting the suit

Wednesday 25th November
  • Collecting suit, locking away in secure location

Monday 30th November

  • Steve Harris setting up the suit
  • Learning to use the basics
  • Using application that comes with the suit
  • Try and set up Motion Builder application - enables us to view 3D character model moving in sync with the suit.

That week

  • Film sequence with Hinn Lau

Sunday, 22 November 2009

Training montages

It might be a nice idea to create a training video, something showing progression of the character growing, it would be a good length for the piece.


I could also recreate an existing montage that is done in a different style, for instance the video in the Disney film, Hercules, where Phil trains up the Greek hero. The last part of the video is just fantastic.

Monkey Magic

This video is taken from Monkey, a 70s Japanese series about a pilgrimage from China to India, based on the book 'Journey to the West' by Wu Cheng'en.

Half way through the video there's a really cool fight scene where Monkey is turning left and right hitting different people back. It might be quite nice to have a lot of enemies attacking the model and have him battling through it. This would also give me the chance to compare movement created in Blender with and without motion capture files.

It could also be a plan to have the character breaking blocks, either with his hands or a stick.

Uncharted 2 - Motion capture

This was a really interesting video about the use of MOCAP suits in Sony's Uncharted 2, it's really cool seeing the action happening with the models replicating the movement behind on a screen.

One of them mentioned how it was amazing when seeing themselves in the game world, and it made them realise they were just a "tiny person in this huge animation".

It was also interesting that when the actors used the MOCAP suits their hands and faces weren't recorded and the expression was all created by the animators.

Motus Digital - Ninja Toy 2


Chris Taylor (young boy) and Brandon Campbell are involved in this fantastic video displaying some motion capturing and fast flowing fight sequences. Below is the finished piece, it's astounding to see it in action as something else. It makes me very excited about what can be achieved with some hard work and a great idea.

Incredible martial art movement

Some of this stuff is unbelievable, the amount of spinning people can create from standing. But if I was to capture this movement with the MOCAP suit I'd need to find someone that could do this. So movement to this extent is impossible.

Monday, 9 November 2009

Power Rangers

To really make use of the MOCAP suit I need to record fast and fluid sequences. I would like to capture arms flying about and the character jumping and kicking. Martial arts is a great example of this but I would like to give my animation a comedic feel too. Power Rangers uses martial arts and kung fu fighting but is not in a serious manner. I think it might be the ideal action to base my MOCAP sequences on.


I may have a video sequence of a coloured power ranger (which I'd model and texture), with it's normal face in the bottom corner, which I could maybe also animate. This would give me another technique to learn (Bones in Blender).

I'd like to display a number of different intro stances/actions, and then a fight. I could add the enemies in after, and get them to explode on hit.

GANTT Chart


Skills

I will learn a number of things working with the MOCAP suit:

  • How to use the suit
  • How to input the MOCAP files into a digital package (Blender)
  • Improve my camera skills
  • Learn video editing skills
  • Improve my animation skills
  • Improve my modelling skills
  • Improve my texturing skills

Research


It seems unusual that the same guy (Andy Serkis) did the motion for King Kong and for Gollum because they’re such different characters. But this shows how useful the Motion Capture suit can be because you can animate something entirely different without having to go through keyframes moving body parts.

Initial Research

Research

Doing something with the motion capture suit will be beneficial to future students on the CGAT pathway because it has not been used before, by documenting well and stating findings our predecessors will be able to create their own pieces using my research and experiences.

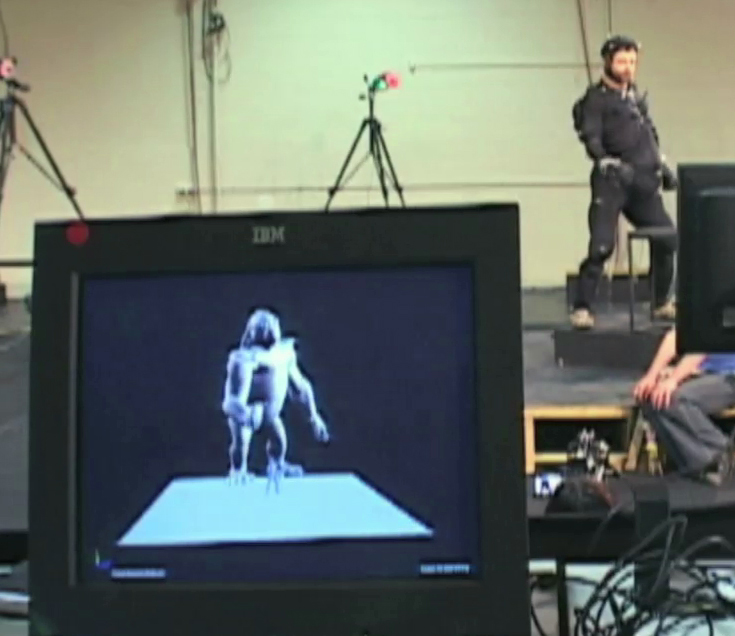
  • Motion capture records only the movements of the actor, not his/her visual appearance.
  • This animation data is mapped to a 3D model so that the model performs the same actions as the actor.
  • Camera movements can also be motion captured so that a virtual camera in the scene will pan, tilt, or dolly around the stage.
  • This allows the computer generated characters, images and sets, to have the same perspective as the video images from the camera.
  • Complex movement and realistic physical interactions such as secondary motions, weight and exchange of forces can be easily recreated in a physically accurate manner.
  • Movement that does not follow the laws of physics generally cannot be captured.
  • Traditional animation techniques such as added emphasis on anticipation and follow through, secondary motion or manipulating the shape of the character as with squash and stretch animation techniques must be added later.
  • Performer wears markers near each joint to identify the motion by the positions or angles between the markers.

Bullets taken from en.wikipedia.org/wiki/Motion_capture

Mocap Suit

Brief

I intend to work with the motion capture suit; understanding how it works and getting familiar with using it. This module is a fantastic opportunity to use the suit and the only way I can record the into storyboards I will record a friend doing the movements, from there I'll put the MOCAP files into a modelling package (possibly Blender) and model the findings into either a Power Ranger form or my own creation. I will also record the process with a video camera to document the problems and the overall experience of the motion capture process.

Specification

  • I must learn to use the MOCAP suit
  • I must record fluid sequences of movement
  • I must make a video diary (using video camera)
  • I should do this in the Power Rangers style
  • I should texture the model
  • I should create backgrounds
  • I could animate other parts of the animation (background, trees etc.)
  • I could create a fight comparing MOCAP animation with an animated model in Blender

Initial Ideas

Motion Capture Suit
  • Take files into engine
  • Clearn up, make flow
  • Unreal 3

2D Animation

  • To music sequence
  • Exploring new skills
  • Cell by cell

Getting Started

In this module I will produce a professional piece relevant to my Gaming and Animation degree that will straight into my portfolio. I will go about it as a professional would and demonstrate attainment in technical, profesional and market knowledge.
  • research
  • specification
  • design documentation
  • development
  • evaluation

Deliverables

  • WEEK 15 - 30/10/09 - Ass1) Initial Research and Outline Plan
  • WEEK 19 - 27/11/09 - Ass2) Skills Development and Professional Issues (Blog/Logbook)
  • WEEK 42 - 07/05/10 - Ass3) Product, Report and Evaluation